
Getting started with Search Console is super easy. It’s free and there are a variety of ways to set up, depending on what works best for you.
Why use Search Console?
Google Search Console (or GSC) is one of the most — if not most — powerful SEO tools out there.
At its core, Search Console helps you monitor, maintain, and optimize your website’s organic search presence. While most primarily use it to view clicks and impressions, GSC has much more to offer.
For example, it can help you:
- Find search queries that drive traffic
- Find how well all your pages rank
- Add Sitemaps
- Locate Errors
- Monitor your core web vitals
And did we mention it’s free?
And did we mention it’s free?
How to set-up a Search Console account
- Sign in to search console with your Google Account
You’ll need to have a Google account for this method. Don’t worry, that’s free, too. If you already have Google Analytics, Adwords or Gmail, you can use the same login.
Related Article: How to Set Up Google Analytics: A Step-by-Step Guide
2. Enter Your Website’s Domain (or URL-Prefix) to Add a Property.
After you sign in, you have the option to add a property type via your domain or via a URL prefix.

We recommend you set up Google Search Console using a domain.
Here’s why starting with some key definitions:
- Property: a term used to refer a single website, URL, mobile app or device with a uniroot directory of your siteque Tracking ID
- Domain: the name of the website. Our Domain is aiadvertisment.net
- Sub Domain: an extension added to a domain.
- URL: an address for a web page
Setting up Search Console via the “Domain” option sets up your account as a domain-level property.
This means you’re creating a single property that includes all subdomains and protocol prefixes associated with your domain. In other words, this option connects Google Search Console to every aspect of your site.
So here’s the next step for how to set up Google Search Console with a domain-level property. Enter your site’s root domain in the entry field and hit “Continue.”
Selecting “URL-prefix” sets up a URL-prefix property.
This means you’re creating a single property for only one URL prefix. As such, Search Console will only be connected to one version of your site – not the whole thing with all protocols/subdomains – and so it may not provide accurate data. But sometimes you have no choice but to use a URL prefix.
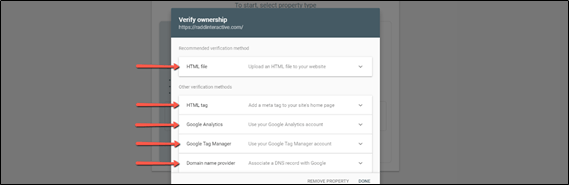
3. Verify your website:
To implement Google Search Console and start gathering data, you need to verify that you own your site.
The verification process varies depending on which option you chose in the previous step.
Jump to the instructions that apply to you:
- Verification for a Domain Property
- Verification for a URL-prefix Property
Verification for a Domain Property:
There is only one way to verify a domain-level property, and that’s through your DNS provider.
Here’s the screen you’ll start with.
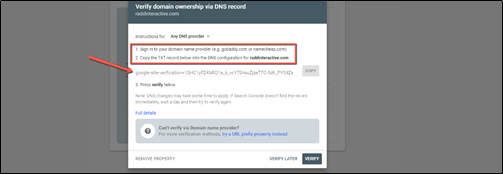
First, see if you can find your DNS provider (the company you pay to use your domain) in the dropdown:
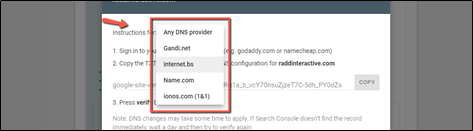
This will display detailed instructions specific to your provider. If you want to know how to implement Google Search Console for your digital marketing strategy, using this method, you might want to work with either your developer or DNS provider.
If you don’t see your provider, you can leave it as “Any DNS service provider.”
Next, hit the “Copy” button to copy the TXT record provided to you by Google.
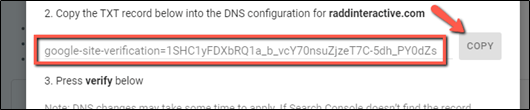
Once you’ve copied the TXT record, open your domain registrar’s site in a new tab and log into your account with them.
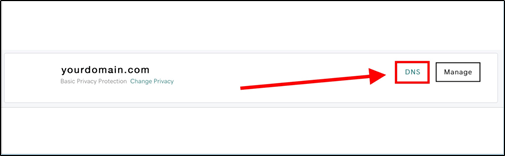
Navigate to the dashboard of your website and select a domain you wish to manage. Look for the option to manage DNS records. This will be located in different places, depending on your provider’s site. Find any mention of “DNS” and click it.
For example, on GoDaddy you would go to “My Account > My Products” and select “DNS” next to your domain.
You’ll then be brought to a Domain Management screen where you’ll find a list of your DNS Records. Select “Add” to create a new one.

Select “Type” choose TXT. Under “Host” type in the @ symbol. Leave “TTL” at 1 hour. And, most importantly, paste the TXT record you got from Google into the field for “TXT Value.” Then hit “Save.”

This will add a new TXT record for Google Search Console
The process we just outlined above for GoDaddy is very similar for all domain providers. You can even use the same entries for “Type,” “Hostname,” and “TTL.” Some providers will ask for “TXT Record” instead of “TXT Value.”
With your TXT record added, return to the Google Search Console set up and select “Verify.”
If everything went according to plan, you should see a message like this:
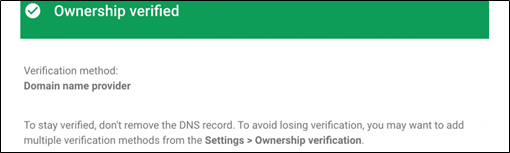
Keep in mind that it may take up to 72 hours for the DNS records you’ve updated to propagate. If ownership verification isn’t complete immediately, come back again in a few hours or the next day and check your domain name’s status.
Verification using URL-prefix Property
If you don’t have access to your registrar or would rather not mess with your DNS records, you can set up Google Search Console using a URL prefix property. This provides a number of alternative options for verification.
Google recommends verifying via an HTML file.
Here’s how to verify via the other methods.
HTML File:
This method is to verify by uploading an HTML file to your root folder. It’s quick and easy, but the downside is you will need access to your server (via File Transfer Protocol or a cPanel file manager). If you’re not familiar with either of these methods then don’t attempt to use this verification method.

HTML Tag:
To verify using the HTML tag you need to add a meta tag to your site’s <head> section. To do so you’ll need to have developer access to your site’s CMS.
Here are the steps to add the GSC HTML tag to WordPress using a plugin:
- Copy the Tag
- Log into your site’s WordPress Admin
- Install the Insert Header and Footers plugin to your site
- Go to Settings > Insert Headers and Footers
- Past the Search Console meta tag in the “Scripts in Header” field.
- Return to Search Console, and select “Verify”
Google Analytics:
If you have a Google Analytics account and installed a tracking code on your site, you can follow the steps for getting started with Google Search Console by verifying a User-prefix property through there. Just open up the Google Analytics verification box in Search Console after logging into your account.
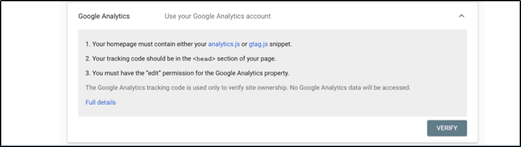
For this to work, you must have selected edit rights in Google Analytics for the item whose tracking code is being used by that property. If you haven’t yet added a Google Analytics tracking code — like analytics.js or gtag.js — to your site, then you’ll need to do that first.
Related Article: How to Set Up Google Analytics: A Step-by-Step Guide
Google Tag Manager:
If you already have Google Tag Manager installed on the site, verification with a single click is possible. To verify, open up the Google Tag Verification Box in Google Search Console.
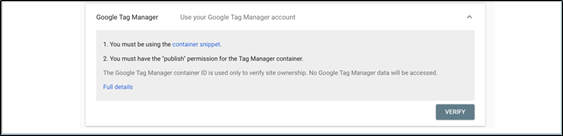
and click “Verify.”
To make this work, you’ll need to have the Tag Manager snippet installed on your site (you can find it in Google Search Console under “Tag Manager”). You will also need to have permissions for Tag Manager set to “PUBLISH.”
Conclusion:
The Google Search Console provides invaluable information to you about your website and can even help you diagnose issues with your search engine optimization (SEO).
Looking for Next Generation Digital Marketing Services, Contact Us at AI Advertisment.